We have walked through the majority of this cottage, but I could not end this series without showing you the last two main spaces in this home-the bathrooms.
This home only had one bathroom originally, but we felt strongly about adding a powder room for guests, because most people do not want guests using their personal bathroom. The problem was finding a space to add one.
When you originally entered this home and took a right down the hallway, there was a linen closet next to a wall register. There were two closets along the same line(one shown in picture), one in the master bedroom next door, and one in this living area. That is where we created the solution.

We turned the living room closet into the bedroom to give more closet space there.
And as you see below, looking from the master bedroom, we took a portion of the closet and combined it with the linen closet from the hallway, and-voila- a powder room! This location was perfect, as it was right off of the main rooms in the home, and would only need a slight modification to hold a pedestal sink and a toilet.

Below shows the demo of the linen closet from the hallway. We took in a little area into the living room to make it large enough to be a functional powder room. Losing that small area in the living room would be well worth it to have a home with 1-1/2 baths versus just 1.

This shows the build out into the living area. It does not seem like much space, but it greatly enhances the size of the powder room!

Now let's look at the original master bathroom...isn't she lovely? We knew almost immediately that this was going to have to be completely gutted in order to make it functional and aesthetically pleasing. We discussed some ideas on how to update it and leave the footprint the same, but the cost savings was not going to be much, so we moved on to the demo.

This shows the bones of the space. Once we had everything out, we could then see what we had to work with, and brainstorm for the best possible layout.

Some of the back wall had water damage, so it was removed. Now we really had very few restrictions on how to build back in a great master bathroom.

We decided to add a transom window in the bathroom to let in natural light, but to also give privacy to the client.

Finish selection has to be done ahead of the work so that there is no delay on the job, because delay costs money! I spent some time at the tile store with the other finishes looking for the perfect combination for this transitional style home. I love using different tile combinations to add interest and character.

We decided to put a standard tub base in the shower because of the ease of cleanability, but I knew that we would want to pair it with a white wall tile, so that it would all look like one uniform tub/shower. We had a little inset area, as the tub was not the entire length of the back wall, but this was perfect for a built in shelf in the shower. This room had old shiplap, but it was not in good condition. I really wanted to add that masculine feel back to the room,so we added some new shiplap hoping to stain it similar to the original wood walls in the home.

Small spaces especially need careful planning. We looked at a few cabinet options in this room, hoping to maximize storage.

Once the floor tile started going in, I verified that the wall tile and cabinet color were going to work together. Do you notice anything interesting about this wall tile?

Grout colors are very important. It is usually a detail that takes a backseat to the others, but it can truly make or break a design. In this case, I chose a light gray color. White would have been a sleeker look...for a period of time. But it is very hard to keep white grout looking clean, so i always try to find another option if possible.

With the floors now almost done, the wall tile goes up next. It was one of my favorite details in this room.

Isn't that a nice look? This tile is an ombre tile. The edges fade from gray to white. I love how it looks in this shower.

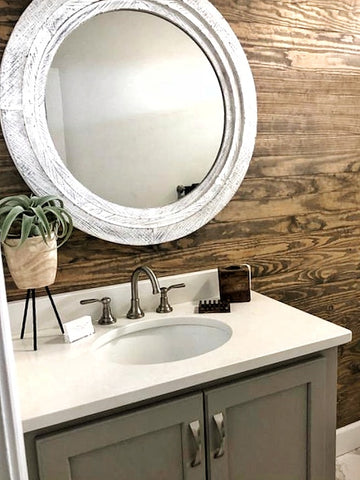
Once the bath cabinet and white top were installed, this space was almost complete. I had to work with my stain guru again to find the perfect stain to make this bathroom stand out.

He did a great job! This dark wall next to the light finishes creates the perfect contrast in this space.

And now for the great reveal...


I love how this window turned out!

Cabinets that look like stand alone furniture pieces add an upscale look for a small investment.


How great is this original hardware? Vintage pieces mixed in with a sleek new style is perfection!

And now to see the finished powder room! We left the original shiplap on this side entry wall to add some rustic charm.


This home was an amazing transformation. If you liked following along with this project, then you are in luck. There are more re-designed spaces on the way!
To make sure you stay up to date with my design projects, events and more, you can find me on Instagram, Facebook, and join my VIP Facebook Group. That way, you won't miss out on anything!
-Amy